Content is empty
If you don't find the content you expect, please try another search term
Found 0 result in total

Content is empty
If you don't find the content you expect, please try another search term
Last updated:2021-08-04 11:26:31
You can connect to an instance from the console through WebVNC. If a public IP address is assigned to the instance, you can also connect to the instance through SSH or remote connection. However, only a single instance can be connected from the console at a time.
Before the connection, make sure that the instance is in Running state. If the instance is in Stopped state, you must start it first.
The default username is ubuntu for Ubuntu systems and root for all the other Linux systems. If you forget your password, you can reset the password in the console.
Log in to the KEC console.
In the list of KEC instances, find the Linux KEC instance to which you want to log in and click Connect Instance in the Operation column.
Before you log in to an instance by using SSH, you must assign a public IP address to the instance add port 22 in inbound security group rules. For more information about security group settings, see Configure a security group.
The following example describes how to use the Windows-based PuTTY client to connect to a Linux KEC instance.
1) Download and run the PuTTY client.
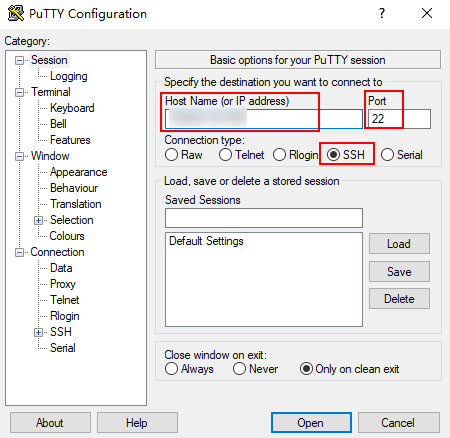
2) In the PuTTY Configuration window, click Session at the top of the tree on the left and set the following parameters:
- **Host Name (or IP address)**: Enter the public IP address of the KEC instance.
- **Port**: Use the default port number **22**.
- **Connection type**: Select **SSH**.
3) Click Open.
4) Enter your password and press Enter. The following figure shows the interface after successful login.
1) Download and run the PuTTYgen and PuTTY clients.
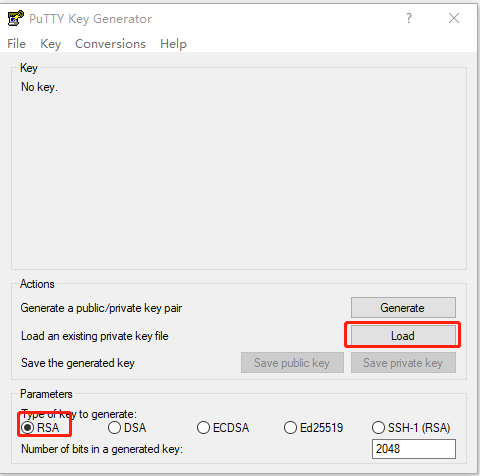
2) Use the PuTTYgen client to convert the key file that is downloaded from the KEC console into a .ppk private key file.
Select **RSA** for **Type of key to generate** and click **Load**.

Select **All Files** and then the private key file to be converted. In the dialog box that appears, click **OK**.
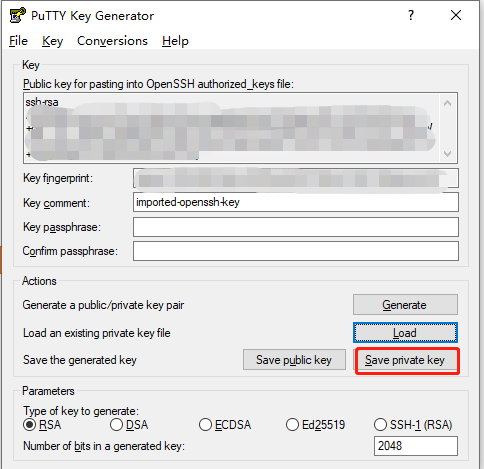
Click **Save private key**.

In the dialog box that appears, click **Yes**.
Specify the name of the .ppk private key file and click **Save**.3) Use the PuTTY client to log in to the KEC instance.
Choose **Connection** > **SSH** > **Auth**, click **Browse**, and then select the .ppk private key file that is generated.

Click **Session** and set the relevant parameters. For more information, see the "Password-based login" section.

Click **Open**. Enter your password and press **Enter**. The interface that appears after successful login is the same as that in the "Password-based login" section.The default username is kingsoft for Windows systems. If you forget your password, you can reset the password in the console.
Log in to the KEC console.
In the list of KEC instances, find the Windows KEC instance to which you want to log in and click Connect Instance in the Operation column.
In the window that appears, click Ctrl+Alt+Delete under Key Operations in the upper-right corner.
If the screen stays black, it is hibernating. Press any key to wake it up.
Before you use remote desktop connection, you must add port 3389 to inbound security group rules. For more information about security group settings, see Configure a security group.
The following example describes how to use Remote Desktop Connection in Windows to connect to a Windows KEC instance.
Click Start in your local Windows operating system.
Enter mstsc in the search box on the task bar and press Enter. Find the Remote Desktop Connection application.
Click this application, enter the public IP address of the KEC instance, and then click Connect.
Pure Mode
