Overview
This topic describes how to manage the lifecycle of a Kubernetes-native Deployment, for example, how to create, configure, and delete a Deployment.
Create a Deployment
To create a Deployment, perform the following steps:
- Log in to the KCE console.
- In the left navigation pane, click Cluster.
- Click the ID of the cluster in which you want to create a Deployment. The cluster details page appears.
- In the left navigation pane, choose Workload > Deployment. The Deployment list page appears.
- Click Create in the upper-left corner. On the Create Deployment page, complete the required configuration and click Create.
The configuration items are described as follows:
Set Basic Information
- Name: the name of the Deployment, which can be up to 63 characters in length, and can contain lowercase letters, digits, and hyphens (-). The name must start with a lowercase letter and end with a lowercase letter or a digit.
- Region: the region to which the Deployment belongs.
- Cluster: the cluster to which the Deployment belongs.
- Namespace: the namespace of the cluster to which the Deployment belongs.
- Label: the label of the Deployment, which is used to identify the resource.
- Description: the description about the Deployment. Enter a custom description.
Deployment Configuration
Volume
Currently, the following types of volumes are available: HostPath, EmptyDir, Kingsoft Cloud Elastic Block Storage, File Storage, Existing PVC, ConfigMap, and Secret.

- Type: the type of the volume. HostPath, EmptyDir, Kingsoft Cloud Elastic Block Storage, File Storage, Existing PVC, ConfigMap, and Secret are available.
- Volume Name: the name of the volume.
- Resource Name: the name of the storage resource.
- Other Information: the hostpath to which the container is to be mounted.
Notes:
If you use a local disk volume without specifying a source path, a temporary path (corresponding to EmptyDir in Kubernetes storage) is allocated by default.
If you select Kingsoft Cloud Elastic Block Storage, the volume name is the ID of the EBS volume and cannot be modified.
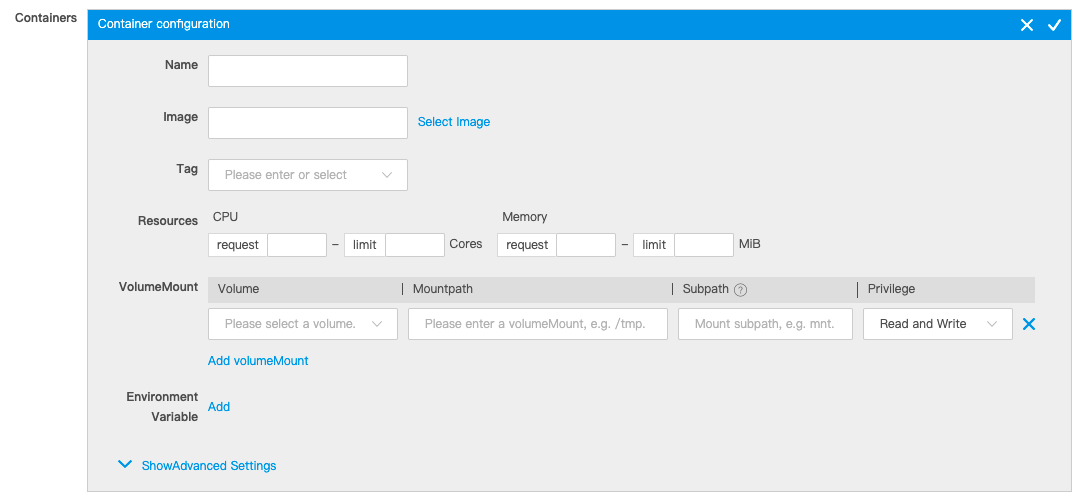
Container configuration
Create containers:

- Name: the name of the container, which can be up to 63 characters in length, and can contain lowercase letters, digits, and hyphens (-). The name must start with a lowercase letter and end with a lowercase letter or a digit.
- Image: the image of the container. You can enter the address of an image repository or click Select Image to select an image from an image repository.
- Tag: the tag of the image.
- Resources: the limits on the CPU and memory resources for the container.
- Environment Variable: the environment variable of the container. You can manually add environment variables to set parameters.
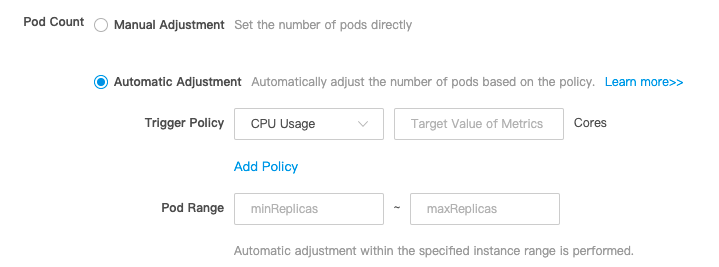
- Pod Count: the number of pods. A pod is composed of one or more containers.
Image Access Credential
This item is available when you pull images from a private image repository. This item corresponds to imagePullSecret in the YAML file.

- ksyunregistrykey is available by default. It matches the private images in the Kingsoft Cloud image repository.
- To use images from a third-party private image repository, create an access credential for the image repository by performing the following operations: Click Add Image Access Credential, select Use New Access Credential, and then click Configure Access Credential. In the dialog box that appears, set the name of the new access credential, enter the repository domain, set the username and password for accessing the image repository, and then click Create Secret.
Access Settings
- Associated Service: If Enabled is cleared, no entry to the container is provided for frontend Service access requests.
- Public Access(LoadBalancer): This option allows Services to be exposed through a public SLB instance so that the Services can be accessed over the Internet.
- Via VPC(LoadBalancer): This option allows Services to be exposed to the VPC where the Kubernetes cluster resides through a private SLB instance so that the Services can be accessed by other Kubernetes clusters or KEC instances in the VPC.
- Intra-Cluster(ClusterIP): This option allows Services to be exposed through a private IP address of the Kubernetes cluster so that the Services can be accessed only within the cluster.
- NodePort(NodePort): This option allows Services to be exposed through the IP address and port number of a node so that the Services can be accessed by other Kubernetes clusters or KEC instances outside the Kubernetes cluster.
After the configuration is completed, click Create and check the status of the Deployment on the Deployment list page.
Basic operations
Update a Deployment
On the Deployment list page, click Update for a Deployment. On the Update Deployment page, update the Deployment configuration based on your business requirements.
Update Policy:
- Rolling Update: This option updates the pods one by one without interrupting your business. You can specify the parameters for a rolling update.
- Recreate: This option deletes all pods and then creates the same number of pods.
Adjust the number of pods
On the Deployment list page, click Adjust Pod Count for a Deployment. In the Adjust Pod Count dialog box, manually set the number of pods.
Select Manual Adjustment, click + or – or directly enter the number of pods, and then click OK.
Alternatively, select Automatic Adjustment and set Trigger Policy and Pod Range so that the number of pods is automatically adjusted.

Redeployment
Redeployment re-pulls the image from the repository for deployment.
On the Deployment list page, move your pointer over More and click Redeploy for a Deployment. In the message that appears, click OK.

Delete a Deployment
On the Deployment list page, move your pointer over More and click Delete for a Deployment. In the message that appears, click OK.

You can determine whether to delete associated Services along with the Deployment as required.


