This topic describes how to manage the lifecycle of a Kubernetes-native job, for example, how to create, configure, and delete a job.
Create a job
To create a job, perform the following steps:
- Log in to the KCE console.
- In the left navigation pane, click ServerlessCluster. The cluster management page appears.
- Click the ID of the cluster in which you want to create a job. The cluster details page appears.
- In the left navigation pane, choose Workload > Job. The job list page appears.
- Click Create in the upper-left corner. On the Create Job page, complete the required configuration and click Create.
The configuration items are described as follows:
Set Basic Information
- Name: the name of the job, which can be up to 63 characters in length, and can contain lowercase letters, digits, and hyphens (-). The name must start with a lowercase letter and end with a lowercase letter or a digit.
- Namespace: the namespace of the cluster to which the job belongs.
- Description: the description about the job. Enter a custom description.
Deployment Configuration
JobSetting
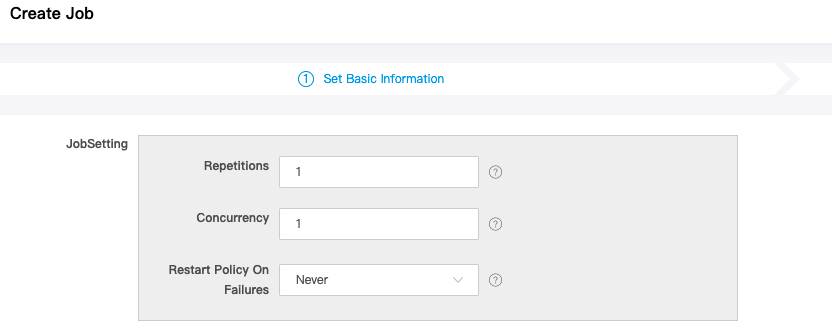 Set the key parameters of the job as required:
- Repetitions: the number of times that pods need to run for the job. Default value: 1.
- Concurrency: the number of pods that run at the same time for the job. Default value: 1.
- Restart Policy On Failures: indicates whether containers in a pod restart upon failures.
- Never: Containers do not restart upon failures. A new pod will be started after all containers exit.
- OnFailure: Containers automatically restart upon failures, and the pod continues running.
Volume

- Type: the type of the volume. EmptyDir, Kingsoft Cloud Elastic Block Storage, Existing PVC, ConfigMap, and Secret are available.
- Volume Name: the name of the volume.
- Resource Name: the name of the storage resource.
- Other Information: the mount information about the Secret or ConfigMap volume.
Note:
If you select Kingsoft Cloud Elastic Block Storage, the volume name is the ID of the EBS instance and cannot be modified.
Container configuration
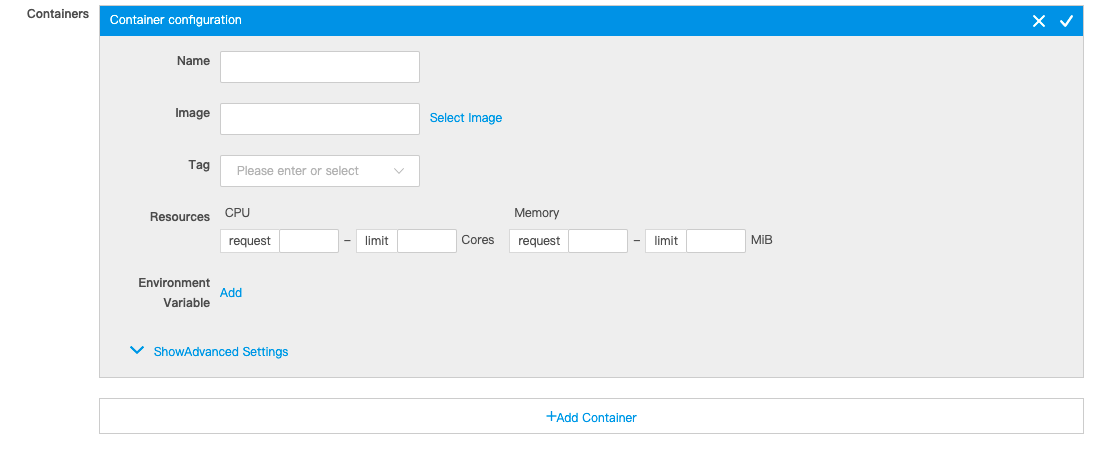
- Name: the name of the container, which can be up to 63 characters in length, and can contain lowercase letters, digits, and hyphens (-). The name must start with a lowercase letter and end with a lowercase letter or a digit.
- Image: the image of the container. You can enter the address of an image repository, or click Select Image to select an image from an image repository.
- Tag: the tag of the image.
- Resources: the limits on the CPU and memory resources for the container.
- VolumeMount: the mount path and read/write privilege of the volume. This item is available only when a volume is added.
- Environment Variable: the environment variable of the container. You can manually add environment variables to set parameters.
Image Access Credential
This item is available when you pull images from a private image repository. This item corresponds to imagePullSecret in the YAML file.

- ksyunregistrykey is available by default. It matches the private images in the Kingsoft Cloud image repository.
- To use images from a third-party private image repository, create an access credential for the image repository by performing the following operations: Click Add Image Access Credential, select Use New Access Credential, and then click Configure Access Credential. In the dialog box that appears, set the name of the new access credential, enter the repository domain, set the user name and password for accessing the image repository, and then click Create Secret.
After the configuration is completed, click Create and check the job status on the job list page.
Basic operations
Check the job status
On the job list page, you can view the running status of all jobs in the current namespace.
- Instances (Successful/Total): indicates the running status of the job. Total indicates the number of repetitions specified in JobSetting. Successful indicates the number of pods that have exited.
Click the name of a job to go to the Pod List tab. In the Status column, you can view the running status of all pods.
In the Info section on the Details tab, you can view the number of pods in the Succeeded, Failed, and Running states.
Delete a job or a pod
To delete a job, go to the job list page and click Delete for the job. In the message that appears, click OK.
To delete a specific pod of a job, go to the job list page, click the job name to go to the Pod List tab, and then click Destroy Instance for the pod.
kubectl operations
To create a job by using a YAML file, click Create Resources by YAML on the job list page. To update an existing job by using a YAML file, click Edit YAML in the job list.
The following sample YAML file describes how to create a job to calculate π accurate to 2,000 decimal places and display the result.
pi-job.yaml:
apiVersion: batch/v1
kind: Job
metadata:
  name: pi
spec:
  completions: 2
  parallelism: 2
  template:
    spec:
      containers:
      - name: pi
        image: perl
        command: ["perl",  "-Mbignum=bpi", "-wle", "print bpi(2000)"]
      restartPolicy: Never
  backoffLimit: 4
- spec.completions: the number of times that pods need to run for the job.
- spec.parallelism: the number of pods that run at the same time for the job.
- spec.template: the pod configuration template of the job.
- spec.backoffLimit: the fault-tolerance limit of the job. When this value is reached, no pod will be created, but the job will exit. Default value: 6.
Create the job
# kubectl apply -f pi-job.yaml
Check the job status
# kubectl get job